How to: Setup a Personal e-mail Server on Ubuntu 24.04 Digital Ocean
Setting up an e-mail Server on Ubuntu 24.04 LTS
yourdomain.com is a placeholder for your actual domain name.
123.456.789.101 is a placeholder for your server's ip address.
Replace yourdomain.com with whatever domain name you're chosen.
Replace 123.456.789.101 with your server's ip address.
Required tools
- Digital Ocean VPS Running Ubuntu 24.04 LTS
- Cloudflare DNS
- ufw 0.36.2
ufw version - certbot 2.11.0
certbot --version - Postfix 3.8.6
postconf -d mail_version - Dovecot 2.3.21
dovecot --version - Spamassasin 4.0.0
spamassassin -V - MySQL 8.0.37-0ubuntu0.24.04.1
mysql -V - OpenDKIM 2.11.0
opendkim -V 2>&1 | head -1
Enabling ufw and Allowing Required Ports
Ensure that ufw is up and running and allow the following ports.
- 25, SMTP standard port
- 80, HTTP for certbot
- 110, POP3 port
- 143, IMAP port
- 443, HTTPS for certbot
- 465, SMTPS TLS port
- 587, SMTP default port
- 993, IMAPS port
- 995 POP3S port
sudo ufw enable
sudo ufw start
sudo systemctl enable --now ufw
sudo ufw allow 25,80,110,143,443,465,587,993,995/tcp
Cloudflare DNS setup
An A record is required to link your yourdomain.com to the server's ip address of 123.456.789.101

Another A record directs the subdomain mail.yourdomain.com to 123.456.789.101

An MX record for e-mails to be routed to mail.yourdomain.com with priority 0

An SPF record authorizes the server's IP address to send mail for the domain. Add a TXT record for yourdomain.com:
v=spf1 ip4:123.456.789.101 ~all
~all— Emails from unauthorized sources are soft-failed. Change to-allto hard-fail once SPF and DKIM are verified working.
A DMARC record instructs receiving servers how to handle emails that fail SPF or DKIM checks. Add a TXT record for _dmarc.yourdomain.com:
v=DMARC1; p=quarantine; rua=mailto:dmarc-reports@yourdomain.com
p=quarantine— Emails that fail DMARC checks are sent to spam. Change top=rejectto outright reject failing messages once the configuration is verified.rua— An email address to receive aggregate DMARC reports.
Enable DNSSEC by navigating to DNS → Settings in Cloudflare and toggling DNSSEC on. Cloudflare will automatically add the required DS record if the domain is registered through Cloudflare.
The DKIM s1._domainkey.yourdomain.com TXT record is generated later in the Configuring OpenDKIM section.
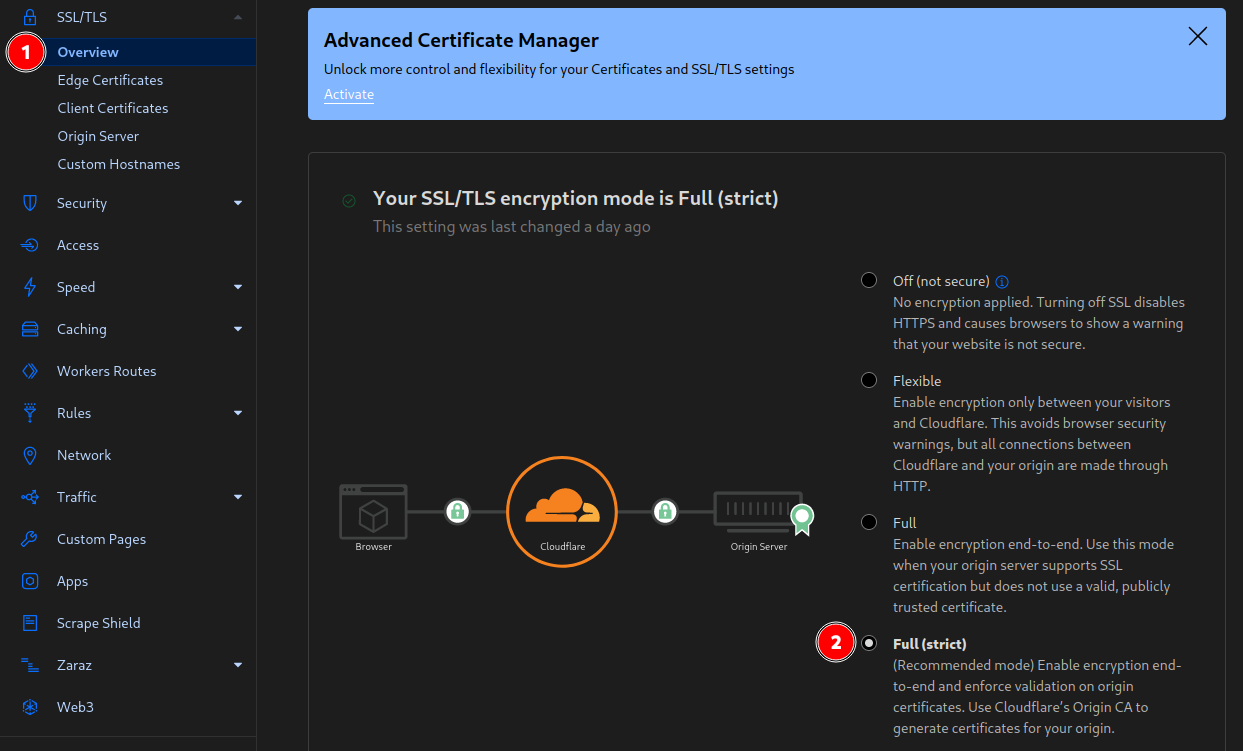
Change Cloudflare SSL settings to "strict"
certbot configuration
The e-mail server will use TLS encryption will be provided by certbot.
# snap install --classic certbot
Symbolically link certbot's snap binary to /usr/bin/
sudo ln -s /snap/bin/certbot /usr/bin/certbot
Configure certbot by following the prompts.
sudo certbot certonly --standalone
The SSL certificates can be found in the folder /etc/letsencrypt/live/yourdomainname.com/
Installing Packages
The following packages will be used to create a mail server environment.
sudo apt-get update && sudo apt-get upgrade
sudo apt-get install postfix postfix-mysql dovecot-core dovecot-imapd dovecot-pop3d dovecot-lmtpd dovecot-mysql dovecot-sieve mysql-server spamassassin spamc opendkim opendkim-tools
Postfix Installation Dialog
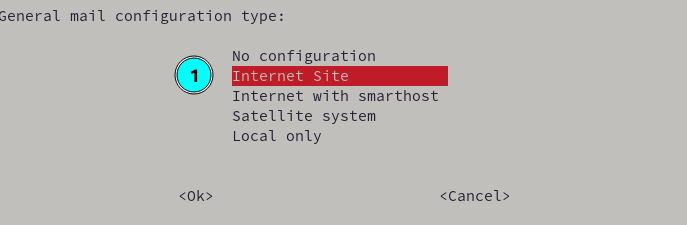
Choose Internet Site as the configuration type.
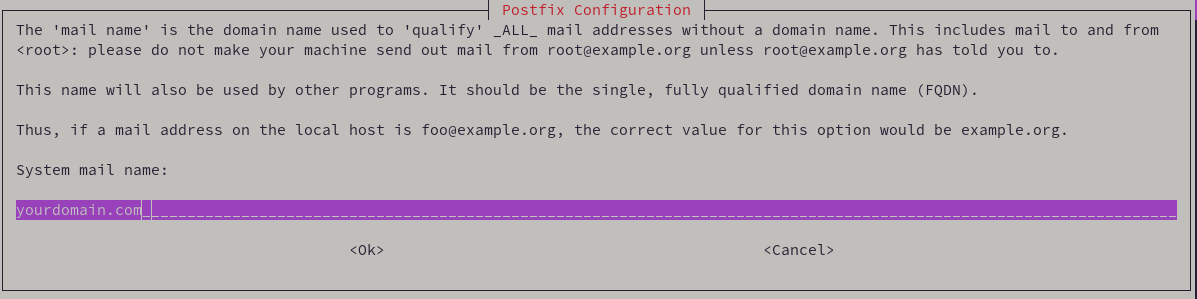
Inputting <yourdomain.com> as the System mail name will suffice. It is not necessary to input the mail subdomain e.g. mail.<yourdomain.com> created earlier.
Configuring MySQL for use with Postfix and Dovecot
Postfix and Dovecot will use MySQL to manage data for user email addresses, aliases for those email addresses, and email domain information.
Ubuntu ships with the mysql_secure_installation tool to help configure the server. It's recommended to change the MySQL root password, remove anonymous user accounts, and disable remote root logins.
sudo mysql_secure_installation
Log into MySQL as the root user
sudo mysql -u root -p
Create a new database for use by the mail server.
CREATE DATABASE mailserver;
Create a database user which can connect from localhost with select permissions over all objects in the mailserver database. Replace password with a secure password.
CREATE USER 'mailuser'@'127.0.0.1' IDENTIFIED BY 'password';
GRANT SELECT ON mailserver.* TO 'mailuser'@'127.0.0.1';
Reload the MySQL database to apply the previous changes.
FLUSH PRIVILEGES;
Switch to the mailserver database and create the following tables to manage virtual domains, virtual users, and virtual aliases.
Create MySQL Tables
USE mailserver;
CREATE TABLE `virtual_domains` (
  `id` int(11) NOT NULL auto_increment,
  `name` varchar(50) NOT NULL,
  PRIMARY KEY (`id`)
) ENGINE=InnoDB DEFAULT CHARSET=utf8;

CREATE TABLE `virtual_users` (
  `id` int(11) NOT NULL auto_increment,
  `domain_id` int(11) NOT NULL,
  `password` varchar(106) NOT NULL,
  `email` varchar(100) NOT NULL,
  PRIMARY KEY (`id`),
  UNIQUE KEY `email` (`email`),
  FOREIGN KEY (domain_id) REFERENCES virtual_domains(id) ON DELETE CASCADE
) ENGINE=InnoDB DEFAULT CHARSET=utf8;

CREATE TABLE `virtual_aliases` (
  `id` int(11) NOT NULL auto_increment,
  `domain_id` int(11) NOT NULL,
  `source` varchar(100) NOT NULL,
  `destination` varchar(100) NOT NULL,
  PRIMARY KEY (`id`),
  FOREIGN KEY (domain_id) REFERENCES virtual_domains(id) ON DELETE CASCADE
) ENGINE=InnoDB DEFAULT CHARSET=utf8;
Add a Virtual Domain to MySQL
Populate the mailserver.virtual_domains table with your domain name. This process can be repeated if more domains need to be inserted into the table.
INSERT INTO mailserver.virtual_domains (name) VALUES ('yourdomain.com');
Adding a Virtual Email Address to MySQL
Creating a password for a new mail account
Use doveadm to generate a SHA512-CRYPT hash to store in the MySQL mailserver database as a user authentication method. Enter a secure password, do not use test
sudo doveadm pw -s SHA512-CRYPT
The command output will be formatted like so, for example this is the output for the password test
{SHA512-CRYPT}$6$wJEmbQXa0Gel/dOB$.IkhCJKdIWgXuzN4cdEHP4Sq1KxiLvzjqE/lFjIKOw0QFmAcnXW8yBMGBS5yNdY47/d9TYwl3QbH8Xxc
{SHA512-CRYPT} (the first 12 char) is ignored, the password starts with $6$. Copy the following
$6$wJEmbQXa0Gel/dOB$.IkhCJKdIWgXuzN4cdEHP4Sq1KxiLvzjqE/lFjIKOw0QFmAcnXW8yBMGBS5yNdY47/d9TYwl3QbH8Xxc
Adding a new mail account user to MySQL
Log back into MySQL as root
sudo mysql -u root -p
Insert the record for a new email user.
INSERT INTO mailserver.virtual_users (domain_id, password , email) VALUES ('1', '$6$wJEmbQXa0Gel/dOB$.IkhCJKdIWgXuzN4cdEHP4Sq1KxiLvzjqE/lFjIKOw0QFmAcnXW8yBMGBS5yNdY47/d9TYwl3QbH8Xxc', 'you@yourdomain.com');
Adding an Email Alias in MySQL
The following SQL creates an alias youralias@yourdomain.com which forwards all emails to you@yourdomain.com. Useful for service accounts which need their contents forwarded.
INSERT INTO mailserver.virtual_aliases (domain_id, source, destination) VALUES ('1', 'youralias@yourdomain.com', 'you@yourdomain.com');
Configuring Spamassassin >= v4.0
Create a user for the spamassassin service (spamd)
sudo adduser spamd --disabled-login
Back up the file /etc/default/spamd
sudo cp /etc/default/spamd /etc/default/spamd.orig
Apply these changes to /etc/default/spamd. Logs will be generated in the file /home/spamd/spamd.log.
--- spamd.orig	2024-06-27 01:19:38.149268502 +0000
+++ spamd	2024-06-27 01:35:00.782726346 +0000
@@ -11,7 +11,7 @@
 # make sure --max-children is not set to anything higher than 5,
 # unless you know what you're doing.

-OPTIONS="--create-prefs --max-children 5 --helper-home-dir"
+OPTIONS="--create-prefs --max-children 5 --username spamd --helper-home-dir /home/spamd/ -s /home/spamd/spamd.log"

 # Pid file
 # Where should spamd write its PID to file? If you use the -u or
@@ -21,3 +21,4 @@

 # Set nice level of spamd
 #NICE="--nicelevel 15"
+CRON=1
Configure Spamassassin's local.cf
Edit /etc/spamassassin/local.cf to enable spam tagging, the Bayesian classifier, and auto-learning. Uncomment or add the following lines:
rewrite_header Subject [SPAM]
report_safe 0
required_score 5.0
use_bayes 1
bayes_auto_learn 1
rewrite_header Subject [SPAM]— Prepends[SPAM]to the subject line of emails that score above the threshold.report_safe 0— Modifies the original message headers rather than wrapping spam as an attachment.required_score 5.0— A message must score 5.0 or higher to be classified as spam. Lower this value (e.g.4.0) to be more aggressive.use_bayes 1— Enables the Bayesian classifier for improved accuracy over time.bayes_auto_learn 1— Allows SpamAssassin to automatically learn from messages it classifies with high confidence.
Configuring Postfix
Back up the main Postfix configuration file /etc/postfix/main.cf and the master Postfix configuration file /etc/postfix/master.cf
sudo cp /etc/postfix/main.cf /etc/postfix/main.cf.orig
sudo cp /etc/postfix/master.cf /etc/postfix/master.cf.orig
Hide the Received and User-Agent headers in Postfix (Optional)
This is an optional privacy measure which hides the IP address of your users along with their operating system / mail client.
Create the file /etc/postfix/smtp_header_checks containing
/^Received: .*/     IGNORE
/^User-Agent: .*/   IGNORE
Create Postfix Interface Files for MySQL
Create the interface .cf files for Postfix
sudo touch /etc/postfix/mysql-virtual-mailbox-domains.cf
sudo touch /etc/postfix/mysql-virtual-mailbox-maps.cf
sudo touch /etc/postfix/mysql-virtual-alias-maps.cf
sudo touch /etc/postfix/mysql-virtual-email2email.cf
File /etc/postfix/mysql-virtual-mailbox-domains.cf contains the following. Replace password with mailuser's password. Ensure user and dbname are correct for the configuration.
user = mailuser
password = mailuserpass
hosts = 127.0.0.1
dbname = mailserver
query = SELECT 1 FROM virtual_domains WHERE name='%s'
File /etc/postfix/mysql-virtual-mailbox-maps.cf contains the following. Replace password with mailuser's password. Ensure user and dbname are correct for the configuration.
user = mailuser
password = mailuserpass
hosts = 127.0.0.1
dbname = mailserver
query = SELECT 1 FROM virtual_users WHERE email='%s'
File /etc/postfix/mysql-virtual-alias-maps.cf contains the following. Replace password with mailuser's password. Ensure user and dbname are correct for the configuration.
user = mailuser
password = mailuserpass
hosts = 127.0.0.1
dbname = mailserver
query = SELECT destination FROM virtual_aliases WHERE source='%s'
File /etc/postfix/mysql-virtual-email2email.cf contains the following. Replace password with mailuser's password. Ensure user and dbname are correct for the configuration.
user = mailuser
password = mailuserpass
hosts = 127.0.0.1
dbname = mailserver
query = SELECT email FROM virtual_users WHERE email='%s'
These are all the changes made to /etc/postfix/master.cf which accomplish the following
- Disable chroot for SMTP
- Add spamassassin as an SMTP filter
- Configures SASL (Simple Authentication and Security Layer)
- Enable STARTTLS
- Enable SMTPS
- Configure the unix pipe for the spamassassin service.
--- /etc/postfix/master.cf.orig	2024-06-26 18:44:45.344869242 +0000
+++ /etc/postfix/master.cf	2024-06-27 13:53:10.286159248 +0000
@@ -9,20 +9,23 @@
 # service type  private unpriv  chroot  wakeup  maxproc command + args
 #               (yes)   (yes)   (no)    (never) (100)
 # ==========================================================================
-smtp      inet  n       -       y       -       -       smtpd
+smtp      inet  n       -       n       -       -       smtpd
+  -o content_filter=spamassassin
 #smtp      inet  n       -       y       -       1       postscreen
 #smtpd     pass  -       -       y       -       -       smtpd
 #dnsblog   unix  -       -       y       -       0       dnsblog
 #tlsproxy  unix  -       -       y       -       0       tlsproxy
 # Choose one: enable submission for loopback clients only, or for any client.
 #127.0.0.1:submission inet n -   y       -       -       smtpd
-#submission inet n       -       y       -       -       smtpd
-#  -o syslog_name=postfix/submission
-#  -o smtpd_tls_security_level=encrypt
-#  -o smtpd_sasl_auth_enable=yes
+submission inet n       -       y       -       -       smtpd
+  -o syslog_name=postfix/submission
+  -o smtpd_tls_security_level=encrypt
+  -o smtpd_sasl_auth_enable=yes
+  -o smtpd_sasl_type=dovecot
+  -o smtpd_sasl_path=private/auth
 #  -o smtpd_tls_auth_only=yes
 #  -o local_header_rewrite_clients=static:all
-#  -o smtpd_reject_unlisted_recipient=no
+  -o smtpd_reject_unlisted_recipient=no
 #     Instead of specifying complex smtpd_<xxx>_restrictions here,
 #     specify "smtpd_<xxx>_restrictions=$mua_<xxx>_restrictions"
 #     here, and specify mua_<xxx>_restrictions in main.cf (where
@@ -31,8 +34,18 @@
 #  -o smtpd_helo_restrictions=
 #  -o smtpd_sender_restrictions=
 #  -o smtpd_relay_restrictions=
-#  -o smtpd_recipient_restrictions=permit_sasl_authenticated,reject
-#  -o milter_macro_daemon_name=ORIGINATING
+  -o smtpd_recipient_restrictions=permit_sasl_authenticated,reject
+  -o milter_macro_daemon_name=ORIGINATING
+smtps     inet  n       -       -       -       -       smtpd
+  -o syslog_name=postfix/smtps
+  -o smtpd_tls_wrappermode=yes
+  -o smtpd_sasl_auth_enable=yes
+  -o smtpd_sasl_type=dovecot
+  -o smtpd_sasl_path=private/auth
+  -o smtpd_client_restrictions=permit_sasl_authenticated,reject
+  -o milter_macro_daemon_name=ORIGINATING
+spamassassin unix -     n       n       -       -       pipe
+  flags=R user=spamd argv=/usr/bin/spamc -e /usr/sbin/sendmail -oi -f ${sender} ${recipient}
 # Choose one: enable submissions for loopback clients only, or for any client.
 #127.0.0.1:submissions inet n  -       y       -       -       smtpd
 #submissions     inet  n       -       y       -       -       smtpd
The changes made to /etc/postfix/main.cf
Ensure that smtpd_tls_cert_file and smtpd_tls_key_file reflect the proper files located in /etc/letsencrypt/live/<yourdomain.com>/
- Configure TLS for the server.
- Configure the SASL method as Dovecot
- Places restrictions on helo, recipients, senders, and relays
- Configure the domain name
- Configure LMTP as Dovecot
- Specify the files used to configure the MySQL interface
- A bunch of restrictions and MTA commands
--- /etc/postfix/main.cf.orig	2024-06-26 18:23:21.628409193 +0000
+++ /etc/postfix/main.cf	2024-06-27 12:59:36.994814873 +0000
@@ -24,24 +24,94 @@


 # TLS parameters
-smtpd_tls_cert_file=/etc/ssl/certs/ssl-cert-snakeoil.pem
-smtpd_tls_key_file=/etc/ssl/private/ssl-cert-snakeoil.key
+smtpd_tls_cert_file=/etc/letsencrypt/live/yourdomain.com/fullchain.pem
+smtpd_tls_key_file=/etc/letsencrypt/live/yourdomain.com/privkey.pem
+smtpd_use_tls=yes
+smtpd_tls_auth_only=yes
+smtp_tls_security_level=may
 smtpd_tls_security_level=may
+smtpd_sasl_security_options = noanonymous, noplaintext
+smtpd_sasl_tls_security_options = noanonymous

-smtp_tls_CApath=/etc/ssl/certs
-smtp_tls_security_level=may
-smtp_tls_session_cache_database = btree:${data_directory}/smtp_scache
+# Authentication
+smtpd_sasl_type = dovecot
+smtpd_sasl_path = private/auth
+smtpd_sasl_auth_enable = yes
+
+
+# See /usr/share/doc/postfix/TLS_README.gz in the postfix-doc package for
+# information on enabling SSL in the smtp client.
+
+# Restrictions
+smtpd_helo_restrictions =
+        permit_mynetworks,
+        permit_sasl_authenticated,
+        reject_invalid_helo_hostname,
+        reject_non_fqdn_helo_hostname
+smtpd_recipient_restrictions =
+        permit_mynetworks,
+        permit_sasl_authenticated,
+        reject_non_fqdn_recipient,
+        reject_unknown_recipient_domain,
+        reject_unlisted_recipient,
+        reject_unauth_destination
+smtpd_sender_restrictions =
+        permit_mynetworks,
+        permit_sasl_authenticated,
+        reject_non_fqdn_sender,
+        reject_unknown_sender_domain
+smtpd_relay_restrictions =
+        permit_mynetworks,
+        permit_sasl_authenticated,
+        defer_unauth_destination

+# See /usr/share/doc/postfix/TLS_README.gz in the postfix-doc package for
+# information on enabling SSL in the smtp client.

-smtpd_relay_restrictions = permit_mynetworks permit_sasl_authenticated defer_unauth_destination
 myhostname = yourdomain.com
 alias_maps = hash:/etc/aliases
 alias_database = hash:/etc/aliases
-myorigin = /etc/mailname
-mydestination = $myhostname, yourdomain.com\, yourdomain.com, localhost.com, localhost
+mydomain = yourdomain.com
+myorigin = $mydomain
+mydestination = localhost
 relayhost =
 mynetworks = 127.0.0.0/8 [::ffff:127.0.0.0]/104 [::1]/128
 mailbox_size_limit = 0
 recipient_delimiter = +
 inet_interfaces = all
 inet_protocols = all
+
+# Handing off local delivery to Dovecot's LMTP, and telling it where to store mail
+virtual_transport = lmtp:unix:private/dovecot-lmtp
+
+# Virtual domains, users, and aliases
+virtual_mailbox_domains = mysql:/etc/postfix/mysql-virtual-mailbox-domains.cf
+virtual_mailbox_maps = mysql:/etc/postfix/mysql-virtual-mailbox-maps.cf
+virtual_alias_maps = mysql:/etc/postfix/mysql-virtual-alias-maps.cf,
+        mysql:/etc/postfix/mysql-virtual-email2email.cf
+
+# Even more Restrictions and MTA params
+disable_vrfy_command = yes
+strict_rfc821_envelopes = yes
+#smtpd_etrn_restrictions = reject
+#smtpd_reject_unlisted_sender = yes
+#smtpd_reject_unlisted_recipient = yes
+smtpd_delay_reject = yes
+smtpd_helo_required = yes
+smtp_always_send_ehlo = yes
+#smtpd_hard_error_limit = 1
+smtpd_timeout = 30s
+smtp_helo_timeout = 15s
+smtp_rcpt_timeout = 15s
+smtpd_recipient_limit = 40
+minimal_backoff_time = 180s
+maximal_backoff_time = 3h
+
+# Reply Rejection Codes
+invalid_hostname_reject_code = 550
+non_fqdn_reject_code = 550
+unknown_address_reject_code = 550
+unknown_client_reject_code = 550
+unknown_hostname_reject_code = 550
+unverified_recipient_reject_code = 550
+unverified_sender_reject_code = 550
Execute the following command to have Postfix check its configuration files for errors.
sudo postfix check
Set Postfix Permissions
Restricts to allow only the owner and the group
sudo chmod -R 755 /etc/postfix
Install Dovecot
Backup the Dovecot Configuration Files
sudo cp /etc/dovecot/dovecot.conf /etc/dovecot/dovecot.conf.orig
sudo cp /etc/dovecot/dovecot-sql.conf.ext /etc/dovecot/dovecot-sql.conf.ext.orig
sudo cp /etc/dovecot/conf.d/10-mail.conf /etc/dovecot/conf.d/10-mail.conf.orig
sudo cp /etc/dovecot/conf.d/10-auth.conf /etc/dovecot/conf.d/10-auth.conf.orig
sudo cp /etc/dovecot/conf.d/10-master.conf /etc/dovecot/conf.d/10-master.conf.orig
sudo cp /etc/dovecot/conf.d/10-ssl.conf /etc/dovecot/conf.d/10-ssl.conf.orig
sudo cp /etc/dovecot/conf.d/auth-sql.conf.ext /etc/dovecot/conf.d/auth-sql.conf.ext.orig
Configure Dovecot
Edit /etc/dovecot/dovecot.conf Replace yourdomain.com with the correct domain name.
--- /etc/dovecot/dovecot.conf.orig	2024-06-26 18:55:44.687655452 +0000
+++ /etc/dovecot/dovecot.conf	2024-06-26 18:58:03.765535818 +0000
@@ -22,6 +22,8 @@

 # Enable installed protocols
 !include_try /usr/share/dovecot/protocols.d/*.protocol
+protocols = imap pop3 lmtp
+postmaster_address = postmaster@yourdomain.com

 # A comma separated list of IPs or hosts where to listen in for connections.
 # "*" listens in all IPv4 interfaces, "::" listens in all IPv6 interfaces.
Edit /etc/dovecot/conf.d/10-mail.conf to alter how Dovecot interacts with the server's filesystem.
--- /etc/dovecot/conf.d/10-mail.conf.orig	2024-06-26 18:55:48.708781677 +0000
+++ /etc/dovecot/conf.d/10-mail.conf	2024-06-26 18:58:52.450242034 +0000
@@ -27,7 +27,7 @@
 #
 # <doc/wiki/MailLocation.txt>
 #
-mail_location = mbox:~/mail:INBOX=/var/mail/%u
+mail_location = maildir:/var/mail/vhosts/%d/%n/

 # If you need to set multiple mailbox locations or want to change default
 # namespace settings, you can do it by defining namespace sections.
Create the directory /var/mail/vhosts/yourdomain.com replacing yourdomain.com with the correct domain name.
sudo mkdir -p /var/mail/vhosts/yourdomain.com
Create a group vmail with an ID of 5000, add a new user vmail to the vmail group. The vmail user will read mail from the server. Change the owner of /var/mail to vmail for it to function properly.
sudo groupadd -g 5000 vmail
sudo useradd -g vmail -u 5000 vmail -d /var/mail
sudo chown -R vmail:vmail /var/mail
Edit the file /etc/dovecot/conf.d/10-auth.conf to disable plaintext authentication and limit the authentication methods to plain and login.
--- /etc/dovecot/conf.d/10-auth.conf.orig	2024-06-26 18:55:51.949880129 +0000
+++ /etc/dovecot/conf.d/10-auth.conf	2024-06-26 19:00:37.287155667 +0000
@@ -7,7 +7,7 @@
 # matches the local IP (ie. you're connecting from the same computer), the
 # connection is considered secure and plaintext authentication is allowed.
 # See also ssl=required setting.
-#disable_plaintext_auth = yes
+disable_plaintext_auth = yes

 # Authentication cache size (e.g. 10M). 0 means it's disabled. Note that
 # bsdauth and PAM require cache_key to be set for caching to be used.
@@ -97,7 +97,7 @@
 #   plain login digest-md5 cram-md5 ntlm rpa apop anonymous gssapi otp
 #   gss-spnego
 # NOTE: See also disable_plaintext_auth setting.
-auth_mechanisms = plain
+auth_mechanisms = plain login

 ##
 ## Password and user databases
@@ -120,7 +120,7 @@
 #!include auth-master.conf.ext

 !include auth-system.conf.ext
-#!include auth-sql.conf.ext
+!include auth-sql.conf.ext
 #!include auth-ldap.conf.ext
 #!include auth-passwdfile.conf.ext
 #!include auth-checkpassword.conf.ext
Edit the file /etc/dovecot/conf.d/auth-sql.conf.ext to configure authentication and storage methods for Dovecot.
--- /etc/dovecot/conf.d/auth-sql.conf.ext.orig	2024-06-27 14:20:59.199684936 +0000
+++ /etc/dovecot/conf.d/auth-sql.conf.ext	2024-06-26 19:02:07.619016890 +0000
@@ -16,9 +16,14 @@
 #  driver = prefetch
 #}

+#userdb {
+#  driver = sql
+#  args = /etc/dovecot/dovecot-sql.conf.ext
+#}
+
 userdb {
-  driver = sql
-  args = /etc/dovecot/dovecot-sql.conf.ext
+   driver = static
+   args = uid=vmail gid=vmail home=/var/mail/vhosts/%d/%n
 }

 # If you don't have any user-specific settings, you can avoid the user_query
Edit the file /etc/dovecot/dovecot-sql.conf.ext to configure Dovecot's connection with MySQL. Be sure that all changed values are correct.
--- /etc/dovecot/dovecot-sql.conf.ext.orig	2024-06-26 18:55:55.836994490 +0000
+++ /etc/dovecot/dovecot-sql.conf.ext	2024-06-26 19:04:45.921779323 +0000
@@ -29,7 +29,7 @@
 # );

 # Database driver: mysql, pgsql, sqlite
-#driver =
+driver = mysql

 # Database connection string. This is driver-specific setting.
 #
@@ -71,14 +71,14 @@
 #   connect = host=sql.example.com dbname=virtual user=virtual password=blarg
 #   connect = /etc/dovecot/authdb.sqlite
 #
-#connect =
+connect =  host=127.0.0.1 dbname=mailserver user=mailuser password=<password>

 # Default password scheme.
 #
 # List of supported schemes is in
 # http://wiki2.dovecot.org/Authentication/PasswordSchemes
 #
-#default_pass_scheme = MD5
+default_pass_scheme = SHA512-CRYPT

 # passdb query to retrieve the password. It can return fields:
 #   password - The user's password. This field must be returned.
@@ -111,6 +111,8 @@
 #  SELECT username, domain, password \
 #  FROM users WHERE username = '%n' AND domain = '%d'

+password_query = SELECT email AS user, password FROM virtual_users WHERE email = '%u';
+
 # userdb query to retrieve the user information. It can return fields:
 #   uid - System UID (overrides mail_uid setting)
 #   gid - System GID (overrides mail_gid setting)
(Optional) Options to use an alias as the username.
- Add the alias as the
sourceanddestinationemail address to thevirtual_aliasestable. - Change the
/etc/dovecot/dovecot-sql.conf.extfile’spassword_queryvalue topassword_query = SELECT email as user, password FROM virtual_users WHERE email=(SELECT destination FROM virtual_aliases WHERE source = '%u');
Change the owner and group of /etc/dovecot/ to vmail and dovecot.
sudo chown -R vmail:dovecot /etc/dovecot
Edit permissions of /etc/dovecot/ recursively in order for the owner, vmail, to read, write, and execute.
sudo chmod -R o-rwx /etc/dovecot
Edit the file /etc/dovecot/conf.d/10-master.conf to accomplish the following
- Disable imap
- Disable pop3
- Enable imaps with SSL on 993
- Enable pop3s with SSL on 995
- Configure Dovecot's Services
- lmtp
- imaps
- pop3s
- auth
- auth-worker
--- /etc/dovecot/conf.d/10-master.conf.orig	2024-06-26 18:55:59.006084942 +0000
+++ /etc/dovecot/conf.d/10-master.conf	2024-06-26 19:16:57.110982719 +0000
@@ -16,11 +16,11 @@

 service imap-login {
   inet_listener imap {
-    #port = 143
+    port = 0
   }
   inet_listener imaps {
-    #port = 993
-    #ssl = yes
+    port = 993
+    ssl = yes
   }

   # Number of connections to handle before starting a new process. Typically
@@ -37,11 +37,11 @@

 service pop3-login {
   inet_listener pop3 {
-    #port = 110
+    port = 0
   }
   inet_listener pop3s {
-    #port = 995
-    #ssl = yes
+    port = 995
+    ssl = yes
   }
 }

@@ -55,16 +55,12 @@
 }

 service lmtp {
-  unix_listener lmtp {
-    #mode = 0666
+  unix_listener /var/spool/postfix/private/dovecot-lmtp {
+    #mode = 0666
+    mode = 0600
+    user = postfix
+    group = postfix
   }
-
-  # Create inet listener only if you can't use the above UNIX socket
-  #inet_listener lmtp {
-    # Avoid making LMTP visible for the entire internet
-    #address =
-    #port =
-  #}
 }

 service imap {
@@ -100,9 +96,16 @@
   # To give the caller full permissions to lookup all users, set the mode to
   # something else than 0666 and Dovecot lets the kernel enforce the
   # permissions (e.g. 0777 allows everyone full permissions).
+
+  unix_listener /var/spool/postfix/private/auth {
+    mode = 0660
+    user = postfix
+    group = postfix
+  }
+
   unix_listener auth-userdb {
-    #mode = 0666
-    #user =
+    mode = 0666
+    user = vmail
     #group =
   }

@@ -112,14 +115,14 @@
   #}

   # Auth process is run as this user.
-  #user = $default_internal_user
+  user = dovecot
 }

 service auth-worker {
   # Auth worker process is run as root by default, so that it can access
   # /etc/shadow. If this isn't necessary, the user should be changed to
   # $default_internal_user.
-  #user = root
+  user = vmail
 }

 service dict {
Edit the file /etc/dovecot/conf.d/10-ssl.conf to require SSL. Edit the file to set the server's SSL cert and key for use with Dovecot. Change <yourdomain.com> to the correct domain.
--- /etc/dovecot/conf.d/10-ssl.conf.orig	2024-06-27 14:40:05.193183149 +0000
+++ /etc/dovecot/conf.d/10-ssl.conf	2024-06-27 14:40:14.311322342 +0000
@@ -3,14 +3,14 @@
 ##

 # SSL/TLS support: yes, no, required. <doc/wiki/SSL.txt>
-ssl = yes
+ssl = required

 # PEM encoded X.509 SSL/TLS certificate and private key. They're opened before
 # dropping root privileges, so keep the key file unreadable by anyone but
 # root. Included doc/mkcert.sh can be used to easily generate self-signed
 # certificate, just make sure to update the domains in dovecot-openssl.cnf
-ssl_cert = </etc/dovecot/private/dovecot.pem
-ssl_key = </etc/dovecot/private/dovecot.key
+ssl_cert = </etc/letsencrypt/live/<yourdomain>.com/fullchain.pem
+ssl_key = </etc/letsencrypt/live/<yourdomain>.com/privkey.pem

 # If key file is password protected, give the password here. Alternatively
 # give it when starting dovecot with -p parameter. Since this file is often
Configure Default Mailboxes
Edit /etc/dovecot/conf.d/15-mailboxes.conf to define the standard set of mailboxes that are automatically created and subscribed for every account on first IMAP login. The special_use flags follow RFC 6154, enabling mail clients to automatically identify folder purposes without manual configuration.
namespace inbox {
  mailbox Drafts {
    special_use = \Drafts
    auto = subscribe
  }
  mailbox Junk {
    special_use = \Junk
    auto = subscribe
  }
  mailbox Trash {
    special_use = \Trash
    auto = subscribe
  }
  mailbox Sent {
    special_use = \Sent
    auto = subscribe
  }
  mailbox Archive {
    special_use = \Archive
    auto = subscribe
  }
}
Configure Sieve Spam Filtering
Dovecot Sieve filters mail at delivery time before it reaches the client. A global sieve_before script runs for every account and routes SpamAssassin-flagged messages into the Junk folder automatically.
Create the global Sieve script directory and the spam filtering script.
sudo mkdir -p /etc/dovecot/sieve
Create /etc/dovecot/sieve/spam-to-junk.sieve containing:
require ["fileinto"];

if header :contains "X-Spam-Flag" "YES" {
    fileinto "Junk";
    stop;
}
Pre-compile the script:
sudo sievec /etc/dovecot/sieve/spam-to-junk.sieve
Edit /etc/dovecot/conf.d/90-sieve.conf to point sieve_before at the global script directory:
-  #sieve_before = /var/lib/dovecot/sieve.d/
+  sieve_before = /etc/dovecot/sieve/
Edit /etc/dovecot/conf.d/20-lmtp.conf to load the Sieve plugin for LMTP delivery:
 protocol lmtp {
-  #mail_plugins = $mail_plugins
+  mail_plugins = $mail_plugins sieve
 }
Edit /etc/dovecot/conf.d/15-lda.conf to load the Sieve plugin for LDA delivery:
 protocol lda {
-  #mail_plugins = $mail_plugins
+  mail_plugins = $mail_plugins sieve
 }
Configuring OpenDKIM
OpenDKIM signs outgoing mail with a cryptographic DKIM signature. Receiving mail servers verify the signature against the public key published in DNS, improving deliverability and preventing spoofing.
Generate a DKIM Key Pair
Generate a 2048-bit key pair for the domain using the selector s1. The private key remains on the server and signs outgoing messages. The public key is published in DNS.
sudo mkdir -p /etc/opendkim/keys/yourdomain.com
sudo opendkim-genkey -b 2048 -d yourdomain.com -D /etc/opendkim/keys/yourdomain.com -s s1 -v
sudo chown -R opendkim:opendkim /etc/opendkim/keys
sudo chmod 600 /etc/opendkim/keys/yourdomain.com/s1.private
Configure OpenDKIM
Replace the contents of /etc/opendkim.conf with the following:
Syslog                  yes
SyslogSuccess           yes
LogWhy                  yes

Canonicalization        relaxed/simple

Domain                  yourdomain.com
Selector                s1
KeyFile                 /etc/opendkim/keys/yourdomain.com/s1.private

Socket                  local:/run/opendkim/opendkim.sock
PidFile                 /run/opendkim/opendkim.pid

OversignHeaders         From
TrustAnchorFile         /usr/share/dns/root.key
UserID                  opendkim
Hook OpenDKIM into Postfix
Add the postfix user to the opendkim group so Postfix can communicate with the OpenDKIM socket.
sudo adduser postfix opendkim
Add the following to /etc/postfix/main.cf:
milter_default_action = accept
milter_protocol = 6
smtpd_milters = local:/run/opendkim/opendkim.sock
non_smtpd_milters = local:/run/opendkim/opendkim.sock
Add the DKIM Public Key to Cloudflare DNS
Display the generated public key:
sudo cat /etc/opendkim/keys/yourdomain.com/s1.txt
Add a TXT record in Cloudflare with:
- Name:
s1._domainkey - Content: The
p=...value from the output above, concatenated into a single string without spaces or line breaks
Verify the private key on the server matches the public key in DNS:
sudo opendkim-testkey -d yourdomain.com -s s1 -vvv
The output should contain key OK.
Start and Enable all systemd Services
sudo systemctl enable --now dovecot
sudo systemctl enable --now postfix
sudo systemctl enable --now spamd
sudo systemctl enable --now opendkim
Configure an Email Client
- Username: An email address that was configured (ex: you@yourdomain.com).
- Password: The password configured for that email.
- Server: (Both incoming and outgoing) A domain that resolves to the server (such as mail.example.com)
- IMAP: Set the port to
993and the SSL/Security settings toSSL/TLSor equivalent. - POP3: If using POP3 instead of IMAP, set the port to
995and require SSL. - SMTP: Set the port to
587and the SSL/Security settings toSTARTTLSor equivalent.
Configuring fail2ban
fail2ban monitors log files and bans IP addresses that show malicious behavior. Install it if not already present.
sudo apt-get install fail2ban
Back up the default jail configuration and create a local override.
sudo cp /etc/fail2ban/jail.conf /etc/fail2ban/jail.local
Edit /etc/fail2ban/jail.local and configure the following jails.
sshd jail
The sshd jail uses aggressive mode to catch all SSH attack patterns. Incremental banning escalates repeat offenders from 12 hours up to 5 weeks.
[sshd]

mode   = aggressive
port    = ssh
bantime = 12h
bantime.increment = true
bantime.factor = 2
bantime.maxtime = 5w
logpath = %(sshd_log)s
backend = %(sshd_backend)s
postfix-auth jail
Bans after a single failed SMTP authentication attempt. Incremental banning escalates from 12 hours up to 5 weeks for repeat offenders.
[postfix-auth]

enabled = true
filter = postfix[mode=auth]
logpath = %(postfix_log)s
backend = %(postfix_backend)s
findtime = 20m
maxretry = 1
bantime = 12h
bantime.increment = true
bantime.factor = 2
bantime.maxtime = 5w
dovecot jail
Monitors Dovecot authentication failures across all mail ports.
[dovecot]

port    = pop3,pop3s,imap,imaps,submission,465,sieve
enabled = true
maxretry = 3
bantime = 12h
bantime.increment = true
bantime.factor = 2
bantime.maxtime = 5w
logpath = %(dovecot_log)s
backend = %(dovecot_backend)s
postfix-disconnect-auth jail (custom)
The default postfix-auth filter only catches completed SASL authentication failures. Some attackers abort the SMTP AUTH handshake before SASL logs it, producing only a disconnect ... auth=0/1 summary line that evades detection. This custom filter catches those aborted auth attempts.
Create the filter file /etc/fail2ban/filter.d/postfix-disconnect-auth.conf:
[Definition]
failregex = disconnect from \S+\[<HOST>\].*auth=0/[1-9]
ignoreregex =
Add the jail to /etc/fail2ban/jail.local:
[postfix-disconnect-auth]

enabled = true
filter = postfix-disconnect-auth
logpath = /var/log/mail.log
maxretry = 3
findtime = 30m
bantime = 12h
bantime.increment = true
bantime.factor = 2
bantime.maxtime = 5w
Enable and start fail2ban.
sudo systemctl enable --now fail2ban
Verify the jails are active.
sudo fail2ban-client status